Unleash the power of keratin for gorgeous hair! As a seasoned beauty expert, I’ll be your trusted guide on this transformative journey. Keratin is nature’s secret ingredient, found in our hair, skin, and nails. It acts as a powerful shield against heat-styling tools, chemicals, and environmental damage. But over time, our natural keratin levels can deplete due to excessive heat or chemical processes. That’s where keratin treatments come in – they replenish what has been lost. These therapies infuse your locks with nourishing proteins for stronger strands that are smoother than silk!
Now let’s explore why keratin treatment is a game-changer:
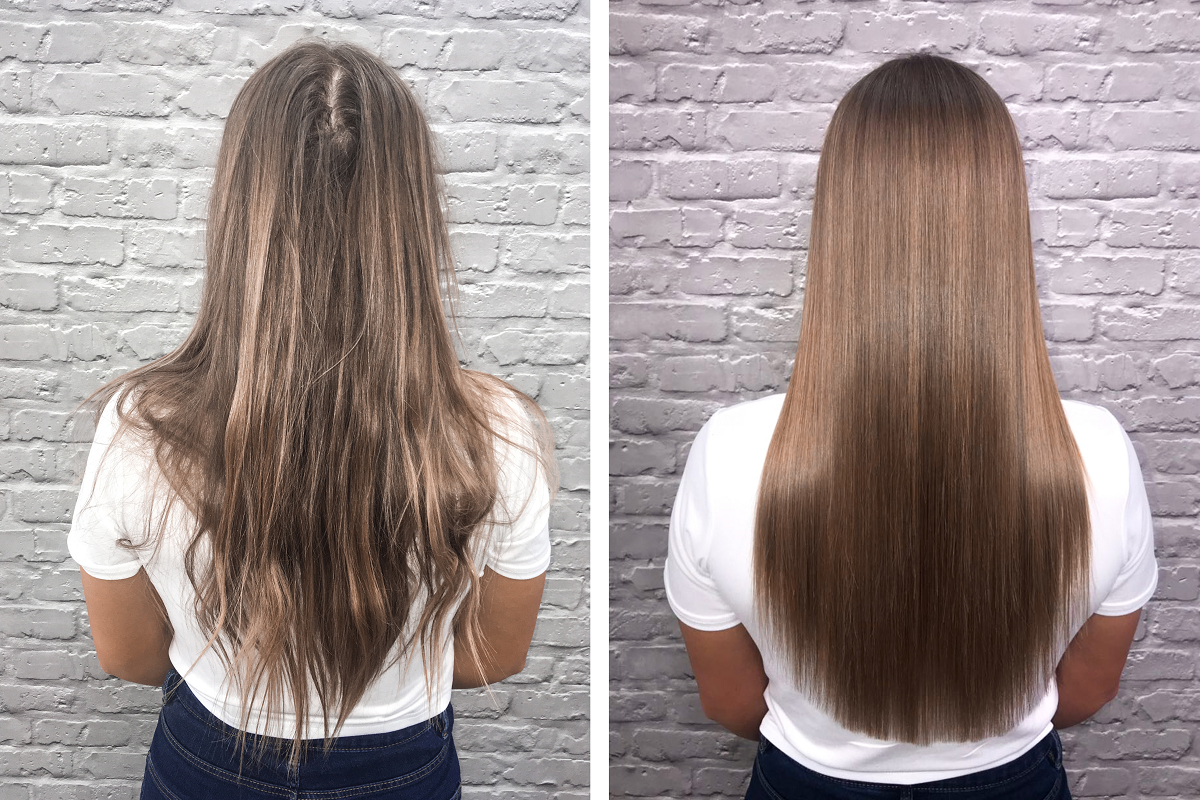
- Banish frizz: Say goodbye to unruly frizz, even on good hair days! Keratin treatments smooth down stubborn cuticles and envelop them in protective protein goodness.
- Master manageability: Tired of wrestling with tangled tresses? With keratin enchantment, combing through your mane becomes effortless as it softens the texture of your hair.
- Radiant shine: Restore natural luster and bestow breathtaking shine upon dull locks with keratin treatments.
- Enduring brilliance: Unlike quick-fix solutions that fade away after one wash, high-quality keratin treatments deliver long-lasting results when applied correctly at home or in-salon settings.
- Repair damage: If your hair has endured relentless heat styling or chemical treatments, the treatment will rescue you by fortifying each strand from within.
In summary, whether you have wild curls or lackluster straight strands, incorporating a keratin treatment into your routine will work wonders for all hair types.
Contents
Choosing the Right Keratin Treatment Product for Home Use
Choosing the right keratin treatment product can be overwhelming. But don’t worry! I’m here to help you make an informed decision.
- Hair Type: Your hair type determines which keratin treatment will work best for you. Whether your hair is fine, coarse, curly, or damaged, there’s a perfect match waiting to transform your locks.
- Desired Results: What do you want from the keratin treatment? Silky smooth and straight strands? Tamed frizz and improved manageability? Knowing your desired results will guide you toward the ideal product.
- Formaldehyde-Free Formulas: Prioritize your health and safety by choosing formaldehyde-free formulas or those with low formaldehyde content. These products minimize irritation and damage risks.
- Brand Reputation: Research different brands and read reviews before making a purchase. Reputable brands guarantee satisfying results and peace of mind.
- Ease of Application: Choose a product that aligns with your skill level and confidence in applying at home.
Now let me introduce some top-rated keratin treatments designed specifically for home use:
- Brazilian Blowout Original Smoothing Solution – This professional-grade formula eliminates frizz while maintaining the hair and leaving it irresistibly smooth.
- Keratherapy Keratin Infused Rapid Rescue – Instantly smooths hair without any downtime, leaving it shiny and free from frizz.
- OGX Keratin Therapy Shampoo – A sulfate-free option that provides long-lasting results while improving overall hair health and strength.
When deciphering labels, keep these tips in mind:
- Look for key ingredients like keratin protein that repair damaged hair from within.
- Avoid harsh chemicals or high levels of formaldehyde that can harm both your hair’s health and overall well-being.
- Pay attention to additional benefits like UV protection or color preservation properties.
By considering these expert tips, you’ll be equipped with the knowledge needed to choose a keratin treatment product that suits your needs perfectly. Get ready for salon-worthy results at home!
Applying the Keratin Treatment at Home: A Comprehensive Guide
Ready to transform your hair from frizzy and unruly to sleek and smooth? Look no further! In this step-by-step guide, I’ll walk you through the process of applying a professional-grade keratin treatment in the comfort of your own home. Say goodbye to expensive salon visits and hello to gorgeous locks that last for weeks on end!
Step 1: Before diving into the application process, start with freshly cleaned hair. Get rid of any styling products or residue by using a clarifying shampoo that thoroughly cleanses your locks. This ensures optimal absorption of the keratin treatment.
Step 2: To achieve even distribution, divide your hair into manageable sections using clips or ties. This technique allows you to work on one section at a time without missing any spots.
Step 3: Follow the specific application guidelines provided with your chosen keratin treatment product. Start by applying a small amount onto each section of hair, starting from roots to ends. Use a comb or brush for an even distribution, ensuring every strand is coated.
Step 4: Gently massage the keratin treatment into your strands using your fingertips for better absorption. Then, use a wide-toothed comb or detangling brush designed specifically for this purpose to carefully comb through each section from roots to ends. Spread out the product while removing tangles along the way.
Step 5: Cover your head with a shower cap or plastic wrap after applying and detangling, allowing ample time (around 30 minutes) for the keratin treatment to work its magic on your tresses. This creates heat and enhances penetration.
Step 6: Once the waiting time is up, grab a round brush and set your blow dryer to medium heat. Focus on smoothing out the strands as you dry each section, sealing in the keratin treatment, and activating its straightening properties.
Step 7: Divide your hair into smaller sections once again after blow drying. Using a flat iron set at an appropriate temperature, slowly glide it down each section of hair until you achieve the desired level of smoothness.
Step 8: Resist the temptation to wash or style your hair immediately after applying the keratin treatment. Give it at least 48 hours to fully set and bond with your strands, creating a protective barrier against frizz and humidity.
Remember, always read and follow the instructions provided with your chosen keratin treatment product for the best results. If you’re unsure about any step of the process, consult with a professional hairstylist who can guide you through it. By following these expert steps carefully, get ready to rock salon-quality hair without leaving home!
Post-Treatment Care: Maintaining Your Keratin-Treated Hair
Congratulations on completing your at-home keratin treatment! Your hair is now gorgeously smooth and frizz-free. But the journey doesn’t end here. To maintain your luscious locks, follow these expert tips for post-treatment care:
- Choose sulfate-free shampoo and conditioner formulated for keratin-treated hair.
- Limit washing to two or three times a week with lukewarm water.
- Style with care, minimizing heat tools and using a protectant spray.
- Shield your hair from UV rays by wearing hats or using leave-in conditioners with UV protection.
- Avoid chlorine and saltwater by wetting your hair before swimming and rinsing thoroughly afterward.
- Opt for loose hairstyles instead of tight ponytails or buns to prevent breakage.
- Schedule regular trims every 8-12 weeks to keep split ends at bay.
- Consult a professional stylist before undergoing other chemical treatments.
By following these expert tips, you’ll prolong the effects of your keratin treatment and enjoy smooth, manageable locks for longer periods of time. Trust me as an expert in this field – I’ve got you covered!
Frequently Asked Questions About Home Keratin Treatment
Let me provide you with valuable insights to help you make informed decisions and achieve salon-quality results from the comfort of your own home.
- What is a home keratin treatment?
A home keratin treatment allows you to transform your hair into smooth, frizz-free locks without leaving your house. By applying a specially formulated product enriched with protein-packed keratin and sealing it with heat, this therapy repairs damaged hair, reduces frizz, and improves overall hair health. - How does a home keratin treatment differ from salon treatments?
While both aim for similar results, there are key differences between salon and home keratin treatments. Salon treatments are performed by professionals experienced in handling different hair types and textures. On the other hand, doing it at home gives you control over the process at your convenience. - Can I achieve salon-quality results with a home keratin treatment?
Absolutely! Thanks to advancements in technology and formulation techniques, high-quality products on the market can deliver professional-level results when used correctly at home. Just be sure to choose reputable brands known for their reliable performance. - Are there any potential side effects or risks associated with home keratin treatments?
When done properly following manufacturer instructions, these treatments are generally safe for most individuals. However, it’s important to perform a patch test before using any new product on your entire head of hair to check for allergic reactions or sensitivities. - How long do the effects of a home keratin treatment last?
The longevity of your results depends on factors such as hair type, maintenance routine, and post-treatment care guidelines adherence. Generally speaking, though, expect smoother and more manageable hair for around 2 to 3 months after each application. - Can I still style my hair after a home keratin treatment?
Absolutely! One of the best things about keratin treatments is that they make styling your hair easier and more efficient. You can still use heat-styling tools like straighteners or curling irons, but remember to protect your hair with heat-protectant products to minimize damage. - Will a home keratin treatment completely straighten my hair?
While these treatments relax curls and reduce frizz, their goal isn’t to permanently straighten your hair. Instead, they enhance manageability and improve overall texture while maintaining some natural movement. - Can I color or bleach my hair before or after a home keratin treatment?
It’s generally recommended to color or bleach your hair before applying a keratin treatment, as the chemicals in these processes may interfere with its effectiveness. However, it’s always best to consult with a professional stylist or refer to the specific instructions provided by the product manufacturer for guidance. - Are there any special considerations for different hair types when using home keratin treatments?
Yes, different hair types may require slightly different approaches when it comes to applying and maintaining a home keratin treatment. For example, individuals with fine or thinning hair should opt for lighter formulations that won’t weigh down their strands. - How often can I do a home keratin treatment?
To avoid excessive protein buildup, which can lead to brittle and weak strands over time, it’s important not to overdo it with frequent treatments. Generally speaking, wait at least 8-12 weeks between each application of a home keratin treatment.
I hope this FAQ section has addressed some of your concerns about doing a keratin treatment at home! Remember, always follow product instructions carefully, and if you have any further questions or doubts, don’t hesitate to seek advice from professionals.